Categories
Gardening Projects

Create a Rustic Picket Garden Planter Box

create-a-rustic-picket-garden-planter-box-9
$58.78 is the cost of this store bought planter box! So create your own for under $15!


Have you seen how much planter boxes are for the garden?

I have and just the other day I was walking the aisle of The Home Depot where I saw a price tag of $58! So I decided to create a rustic picket garden planter box and share my gardening project with you.Create a rustic garden plantr box

For this project you will need:

  • 4- 5/8″ x 5 1/2″ x 6′ Pressure treated Pine Dog Ear Fence Picket ($1.50+ each)
  • 3- 1″ x 2″ x 8″ Pressured treated strips ($1.89+ each)
  • 1 1/4″ SPAX screws (or pre-drill holes and use outdoor screws to avoid splitting)
  • Saw, measuring tape, miter box/saw, screw driver, pencil, and a couple hours or more depending upon skill level

I am lucky to have a (power electric) compound miter saw so cutting the 45 degree angles is a bit faster but you can simply buy a miter box and saw for around $20-25 dollars which will come in handy for future DIY projects in the home and garden. I also have a Ridgid cordless impact driver which makes DIY jobs so much easier. I love Ridgid because they have a lifetime warranty and are powerful enough to do my DIY home and garden projects. Impact driver (what you can put the screw driver bit in) are a must have if you plan on doing more DIY projects so invest once in a great set of tools. (THIS IS JUST MY OPINION BECAUSE I HAVE HAD MANY DIFFERENT BRANDS AND PREFER RIDGID NOW)create-a-rustic-picket-garden-planter-box-tip

Create the rustic picket garden planter box

I ended up making the box roughly 31″H x 10″W x 12″ D and this could easily be made up to 36″wide with the wood purchase above. I had an oops so my box ended up being 31″ which worked out well because the box is easier to pick up and move (empty). I have built square planter boxes and created concrete baskets throughout my garden.

This rustic picket fence garden planter box (boy that was a mouthful) will age and the wood will become browner with age. I have built garden arbor, garden trellis, garden bridge, and tables out of these pine treated fence pickets and I love the way these pickets age (darker). create-a-rustic-picket-garden-planter-box-1

Here are the directions for the basic planter box

The directions are simple for this and measurements could vary if you want to build it to your size. I do have to add one important tip- make sure to check the thickness of each picket because the sides need to be approximately the same thickness or the trim will not sit flush and hold the sides together (as shown in picture). Here’s the cuts you will make:

  • (14) 12″ fence pickets for the sides -precut these pieces
  • (6)  10″ fence pickets for the bottom- precut these pieces
  • (6) 1″ x 2″ strips cut approximately at 13″ -cut after you assemble the sides/bottom
  • (6) 1″ x 2″ strips cut approximately at 31″
    • These cuts are approximate because pickets can vary in size and older pickets dry and shrink as much as a 1/4″
    • You can make this planter box as wide as you want and I measure in increments of 5 1/2″ or the width of the pickets if they vary in your area.
    • Using the width of the pickets as a guide for the size eliminates the need to cut the pickets (ie 6 pickets @ 5 1/2″ = 33″)
create-a-rustic-picket-garden-planter-box-4
Pictured here are 6 board sides but I had to eliminate 1 picket that was thicker than the rest using only 5 pickets per side to make this planter box 31″

create-a-rustic-picket-garden-planter-box-2

Do not cut trim 1″x 2″ pieces until sides and bottom are assembled (note 5 pickets= 27.5″) since these pickets can vary as much as 1/4″

Create a rustic garden planter box
Attach the trim pieces bottom and top using the screws
Create a rustic garden planter box
After you attach the trim pieces move on to the trim pieces that are cut 45 degrees flat for the trim around the top.


create-a-rustic-picket-garden-planter-box-7
This is without the 1″x2″ trim around the top edge.

Thanks for stopping by and checking out my big box store garden planter hack. If you ever have any questions, feel free to comment below or contact me. This is an easy to moderate project if you can saw a board, have a miter box, tape measure, and my favorite SPAX screws from The Home Depot which eliminates the need to pre-drill any holes.

Creating. Inspiring. Gardening without the rules!

2017  copyrighted material C Renee


Categories
Gardening Projects

Using wood shutters for privacy on a deck


Using wood shutters for privacy on a deckA few years ago I ran across these wood shutters for $2 at a garage sale and knew they would work perfectly for my deck project. The house we had bought had no privacy on the one side and every time I walked out on my deck I could see straight in to the neighbors’ windows! I could not handle this, so for a year (or maybe 2) I hunted for ideas to create privacy for me (and for my neighbors) and on one beautiful Saturday morning I pulled up to a garage sale and saw these shutters stacked (and I never painted them) and knew right away my problem had been solved!

Now I did this project several years ago so I do not have pictures to show you but I can explain how I did it. See my house was a fixer upper and the deck was a safety hazard with rotting wood posts and decking (and at one point my 6′ tall son fell off the deck after leaning on a rail!) So I knew that I had to put in new railings… so my brilliant mind (hahaha) thought why not put in 8′ tall posts so I can attach the shutters? So I did. The shutters fit perfectly between the posts (which I securely attached the posts under the deck or cemented in the pillars). I used 1″x2″ furring strips (which are on both sides of shutters to hold them) to attach each shutter as a wall as seen in the picture. The furring strips are also longer (and at least 2″ past the shutters to screw/attach to the 8′ posts to create this wall of privacy shutters.

The wall of shutters stayed in place for years until I took them down this year to put in new rails and pickets in order to get my house ready to sell. It was a sad time but the good news it that the bushes I planted 8 years ago grew enough to create the privacy I needed after the shutters were removed.

There are a few different ways you could probably do this project and I hope this inspired you to think outside the box. Thanks for stopping by!

Keeping it real, creating, and inspiring!

2016-17 copyrighted material C Renee

Categories
Gardening Projects

Garden Project: Rustic wood garden bridge

Garden Project: rustic-wood-fence-picket-garden-bridgeGarden Project: Rustic wood garden bridge

You can create the rustic garden bridge for around $10 if you find the materials on sale at your local home store. When I built this bridge a few years ago the landscape timbers were at The Home Depot for $1 and the dog eared fence pickets were under $1.50 each. Depending upon the time of year and where you live, this project should not cost more than $15 to create.

I do not have step by step pictures

I built this before I discovered the world of posting everything on social media and blogging. I can walk you through the process and you can adjust the measurements to fit your garden. My garden bridge goes over the dry stream bed and connects my backyard garden path and beds with the small grassy area. Garden Project: rustic-wood-fence-picket-garden-bridge

The rustic wood garden bridge is roughly 7′ long and 24″ wide. I made it 24″ wide so I could push my wheelbarrow and lawnmower over the bridge. 24″ also was easy and comfortable to walk over too and since the fence pickets are 6′ long I could cut 3 planks per picket. You will need for this project:

  • 2 landscape timbers (cut them approximately 63″ each, need (3) 12″ pieces for braces)
    • then cut 45 degrees off each end
  • 5- 6′ dog eared fence pickets or 3- 8′ pickets at The Home Depot
    • need 13- 24″ fence pickets for bridge
  • screws or nails

Garden Project: rustic-wood-fence-picket-garden-bridge

From this picture I took this morning, you can see there are 4 pieces attached to the landscape timbers to extend and create the step up rise to the bridge. These triangle shapes are 12″ long to hold 2 planks. This was an after thought because cutting the landscape timbers on each end 45 degrees was too steep and did not work for pushing up a wheelbarrow. I had some scraps of 2x6s so I cut them to support (2) 24″ planks to create the riseup to the bridge. (I hope this makes sense)Garden Project: rustic-wood-fence-picket-garden-bridge

I simply cut 45 degrees on the ends of 2 timbers and then cut (3) 12″ timbers for the middle bracing and support. I used 4″ screws to connect the foundation for the bridge (because I prefer screws but nails are good too). I then used 2″ screws to attach the planks. Dog ear pickets are 5 1/2″ wide so my bridge dimensions were based on measurements of the planks and timbers.

Thanks for checking out my rustic wood garden bridge

Next spring I hope to be in my new home where I will be creating many more rustic wood garden planters, bridges, and arbors. I love sharing with you home and garden projects. If you ever have any questions, feel free to contact me.Garden Project: rustic-wood-fence-picket-garden-bridge

Creating. Inspiring. Gardening without the rules!

2016-17 copyrighted material C Renee


Categories
Gardening Projects

Build a planter box from dog-ear fence pickets

Build a garden planter box from dog ear fence pickets

Build a planter box from a dog-ear fence picket for under $5 and about an hour of your time. I love the way wood planters look in a garden, kind of Zen like, don’t you think?

You may ask why I do not jump on the pallet board trend. Well, to put it bluntly, I have no interest in hunting all over for free pallets (because they are not free when you have to use the gas to drive around finding them!) Plus the idea that they could be dangerous to use just does not appeal to me. However, the 2 main reasons I do not use pallets are:

  1. they are not easy to come by in my area
  2. it is too much work to tear them apart (I do not like extra work)

I love using dog ear fence pickets to build my arbors, planters boxes, and birdhouses. At The Home Depot they are inexpensive and even come in 8′ lengths for bigger projects such as a cute garden shed or chicken coop! The dog-ear pickets also age to a nice brown color and look fabulous in the garden.

Another advantage to building your own planter boxes- cost- because pots can be expensive. I built a larger planter box early this spring for my beloved Japanese Maple and just last night I built this 17″ x 17″ planter box for my 8 year old hydrangea. I had dug up the hydrangea in July in preparation to sell my house and wanted to take it with me. I will be building more planter boxes this fall because I dug up my gardens to take with me to my new home (wherever that may be).Build a garden planter box from dog ear fence pickets

Anyhow, here is a brief description of supplies and what you need to do. To build a 17″ x17″ planter box I used:

  • (3) dog-ear fence pickets from The Home Depot ($1.52 regular price)
    • cut (8) 17″ pieces for the sides of the planter box
    • cut (3) 17 1/2″ pieces for the bottom
    • cut (4) 2″x2″x 11″ for the corners
    • cut (2) 2″x2″x 16 1/2″ for the bottom
  • (1) 2″x2″x8′ treated
  • 1 1/4″- 1 1/2″ brass, deck, or outdoor screws
    • I use SPAX screws from The Home Depot because they come with a bit and you do not have to pre-drill!
  • Drill driver, saw, tape measure, safety glasses, and a pencil

Build a garden planter box from dog ear fence picketsYou can build the planter boxes any size you want. For me I do not like to waste any wood, I sit down and create based on the dimensions of the pickets so I do not have to cut or rip any pickets. (example: the pickets are 5 1/2″ wide so I know the height of the planter will be 11″ inches and I know that a picket is about 71″ so I will divide in increments so there is not much waste)Build a garden planter box from dog ear fence pickets

This planter box took about an hour and I started off by cutting pickets to size and making the box. Then I cut my 2″x2″ pieces for corner supports and assembled with screws (because plants and dirt can get heavy and I worry about strength). I use 2 more 2″x2″ for the bottom by screwing the 3 bottom pieces together and screwing the bottom 3 boards onto the sides of the box with the 2″x2″ on the outside bottom of the planter box for legs. (check picture if this doesn’t make sense)Build a garden planter box from dog ear fence pickets

There really is no need to put drainage because these pickets shrink and there will cracks for water to drain (plus wood absorbs water too). If you do a large planter, then I advise drilling 1/2″ holes and maybe even lining with burlap or fabric to keep dirt in.Build a garden planter box from dog ear fence pickets

Thanks for stopping by and be sure to check out other projects I have done. If you ever have any questions, just contact me here. Happy gardening.

Creating. Inspiring. Gardening without the rules!

2016-17 C Renee Cumberworth

Categories
Gardening Projects

How to build a rustic 6′ garden arbor

How to build a rustic 6' garden arbor, DIY garden arbor
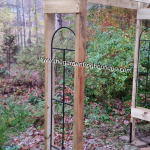
There are plans out there to build garden arbors, trellis, and pergolas but I am here to share with you how to build a rustic 6′ garden arbor for less than $50. In all reality, this will cost you around $85 to install if you use my method and fence mender brackets I found at Home Depot.