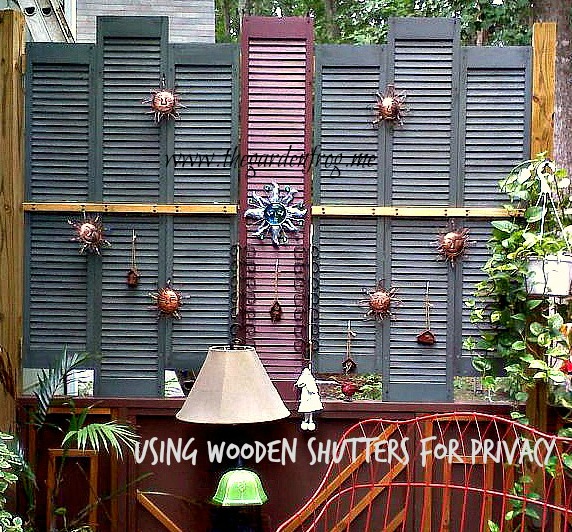
 A few years ago I ran across these wood shutters for $2 at a garage sale and knew they would work perfectly for my deck project. The house we had bought had no privacy on the one side and every time I walked out on my deck I could see straight in to the neighbors’ windows! I could not handle this, so for a year (or maybe 2) I hunted for ideas to create privacy for me (and for my neighbors) and on one beautiful Saturday morning I pulled up to a garage sale and saw these shutters stacked (and I never painted them) and knew right away my problem had been solved!
Now I did this project several years ago so I do not have pictures to show you but I can explain how I did it. See my house was a fixer upper and the deck was a safety hazard with rotting wood posts and decking (and at one point my 6′ tall son fell off the deck after leaning on a rail!) So I knew that I had to put in new railings… so my brilliant mind (hahaha) thought why not put in 8′ tall posts so I can attach the shutters? So I did. The shutters fit perfectly between the posts (which I securely attached the posts under the deck or cemented in the pillars). I used 1″x2″ furring strips (which are on both sides of shutters to hold them) to attach each shutter as a wall as seen in the picture. The furring strips are also longer (and at least 2″ past the shutters to screw/attach to the 8′ posts to create this wall of privacy shutters.
The wall of shutters stayed in place for years until I took them down this year to put in new rails and pickets in order to get my house ready to sell. It was a sad time but the good news it that the bushes I planted 8 years ago grew enough to create the privacy I needed after the shutters were removed.
There are a few different ways you could probably do this project and I hope this inspired you to think outside the box. Thanks for stopping by!
Keeping it real, creating, and inspiring!
2016-17 copyrighted material C Renee


Leave a Reply